1. Use a Dedicated IP Address for Domain & Hosting
Shared IP addresses are more likely to be blacklisted because there may be 100s of other domains using the same server IP address. Use a reverse IP checker such as Viewdns.info to check the status of your domain host.
2. Authenticate & Verify Your Email Address & Domain in MailChimp
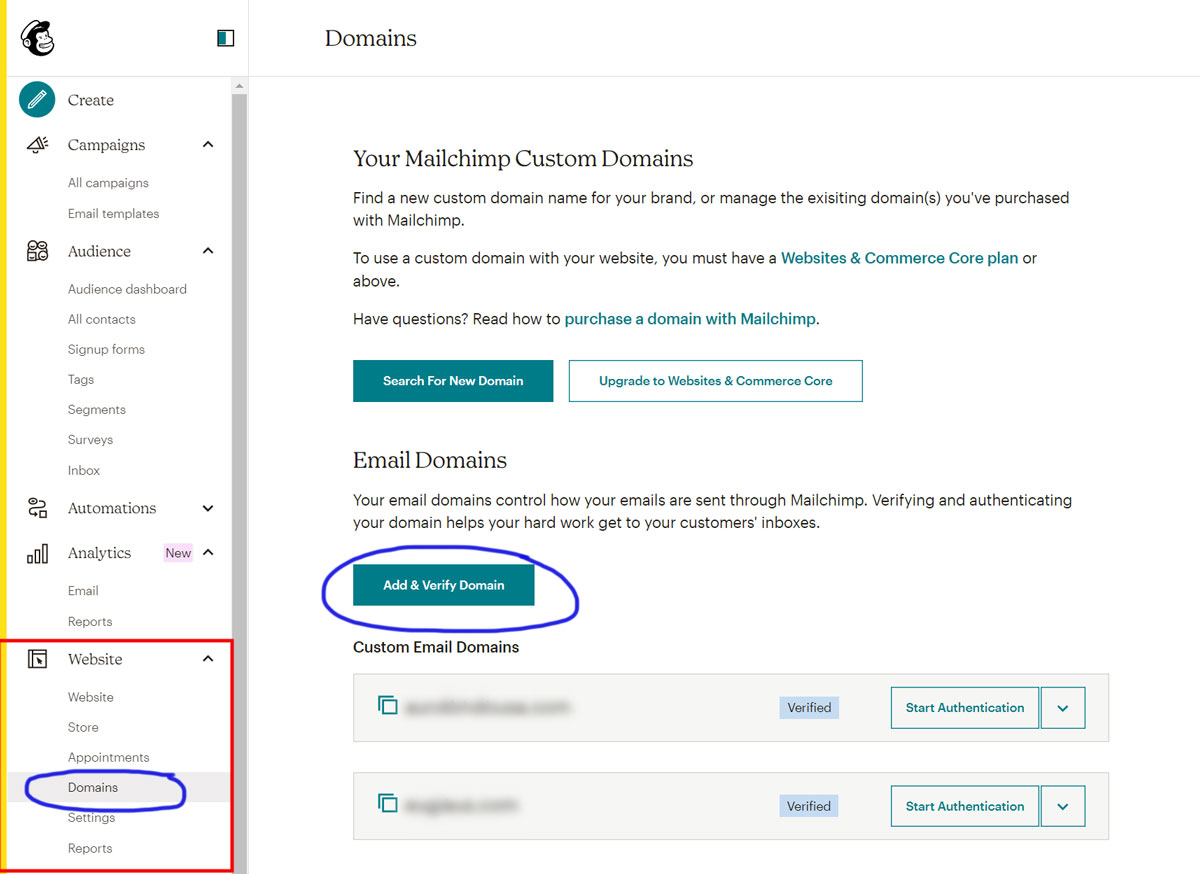
To verify your domain, log in to Mailchimp. Go to Website -> Domains, then click on the Verify Domain button, as highlighted below. You will enter your email address using the custom domain and check your email to verify and authorize the domain.

3. Set up SPF, DKIM, and DMARC DNS Records on Your Domain
SPF and DKIM are also known as “domain authentication” markers which allows MailChimp to send emails on behalf of your domain name instead of from MailChimp servers. These records are added to the DNS. DNS changes may take 24-48 hours to propagate across all servers. In these examples, replace mywebsite.com with your domain.
SPF – Sender Policy Framework
Create a TXT record using this format:
v=spf1 include:servers.mywebsite.com ?all
DKIM – Domain Keys Identified Mail
Create a CNAME record for Host Record k1._domainkey.mywebsite.com with the value dkim. before your domain:
dkim.mywebsite.com
DMARC – Domain-based Message Authentication, Reporting, and Conformance
Create a TXT record using this format with _dmarc. before your domain:
_dmarc.mywebsite.com
4. Check the Reputation of your IP or Domain:
BarracudaCentral.org keeps a history of IP addresses for both known spammers and senders with good email practices and can determine if your domain is in good standing.
5. Check the Spammyness of your Email
Send a test email to Mail-tester.com to quickly check the score of your email out of 10. It will let you know if there are issues in the email structure, subject & preview text, DNS, HTML, images, and broken links.


