

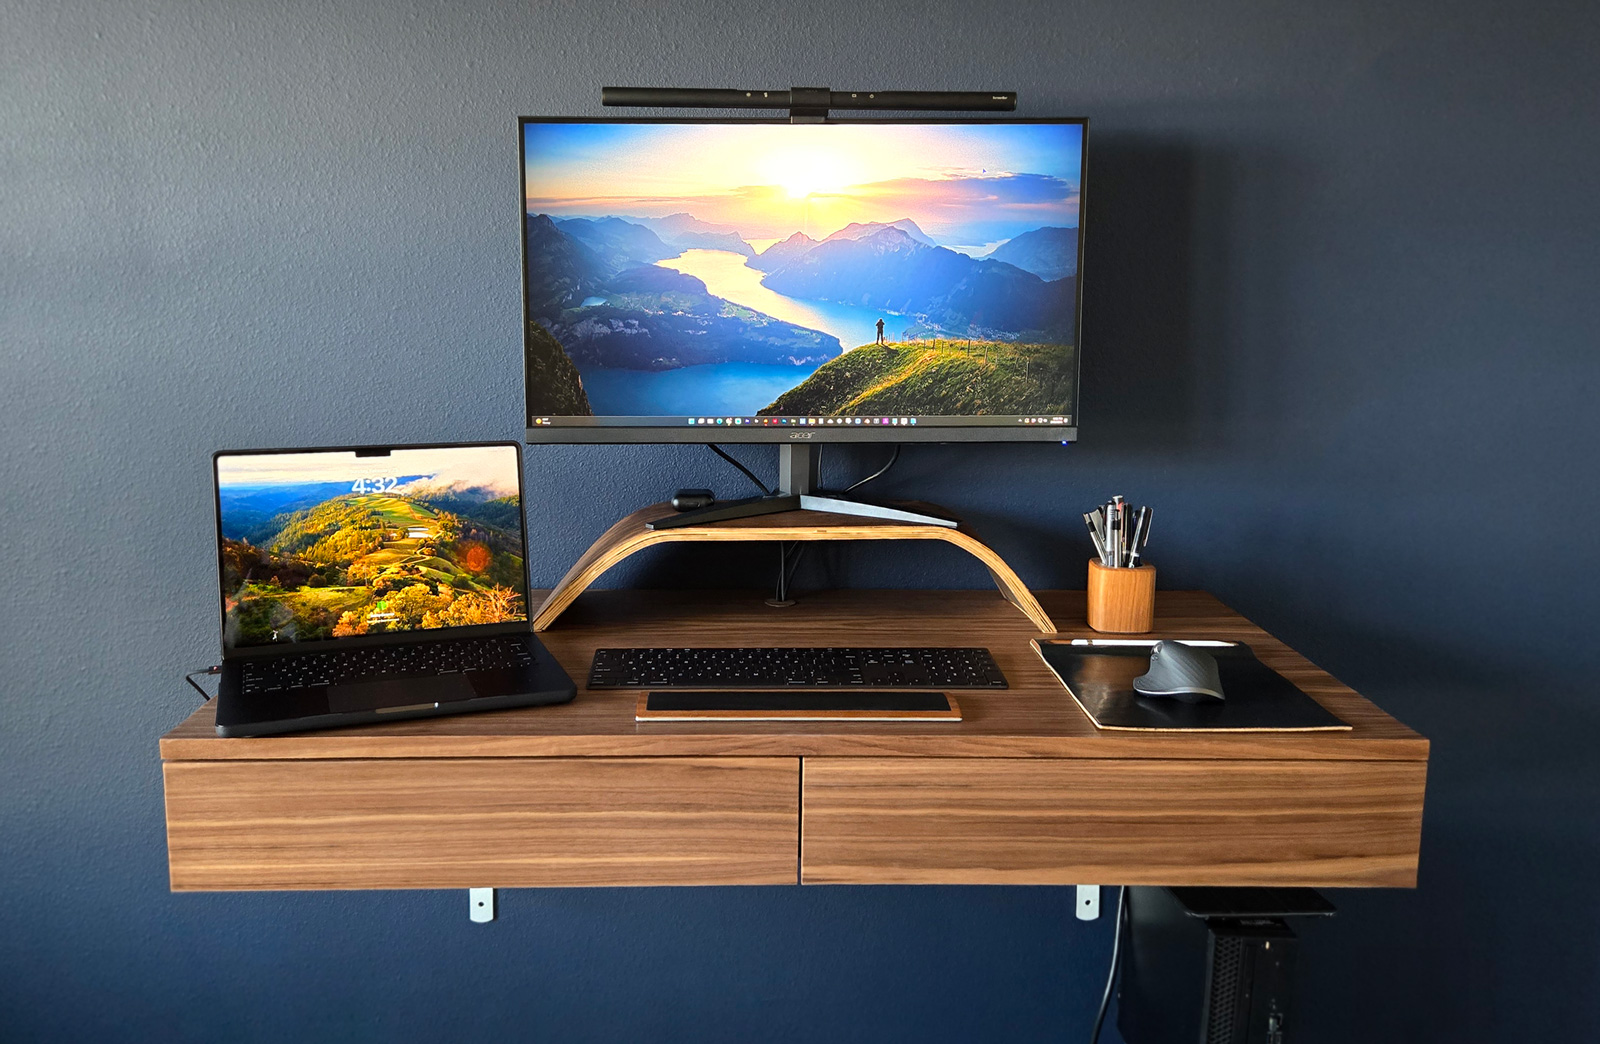
Since 2016 when we moved to Des Moines, I have been inspired to build a walnut finish floating desk to stand or sit and work on the computer. In the interim (which ended up being 8 years) we turned a writing desk from Target into a wall-mounted floating desk. Unfortunately, the walnut finish was unavailable and walnut veneer doesn’t adhere to laminate, or that would have been an easy route.
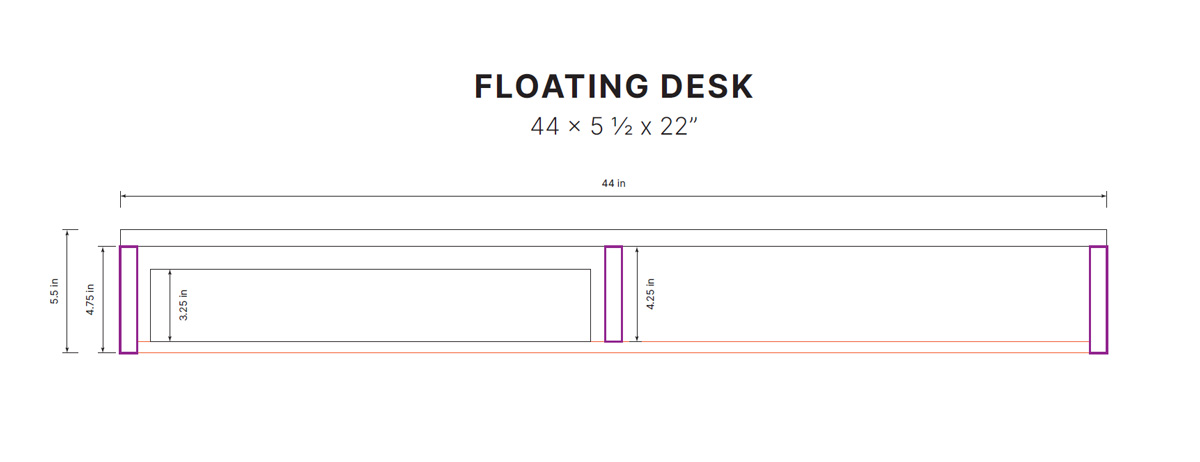
Fast forward nearly eight years… In the spirit of personalizing my office, one evening I spontaneously put a test swatch of paint on the wall and decided it was time to flesh out the specs for the desk since I was already going to have to take down the old desk to paint the wall. Having used the other desk for so long, I realized that I’d like my new desk to be slightly larger in all dimensions.
After 12 days of hard work…
Progression Videos
Here is a YouTube playlist of my building process—both the good and the challenging. I really enjoy engineering, figuring out the specs, and laying out everything… being able to execute the idea is empowering. Every step of the process takes me a very long time and to overcome fears.
Nothing was fast or easy about it and there were at least a few setbacks, but I was determined (partially because of the chaos of my office and living room and my PC being shut down)! And, we had the warmest February I can remember. Several days were in the 50s and even low 60s. I’m not one to do much of anything outside when it’s cold (below 50), but I remember one evening—the night the tilt handwheel broke off the table saw—I could see my breath. I was bundled up in 4 layers and wearing my favorite homeless gloves with no fingertips. I was pretty proud of myself, but that was the night I almost cried. But there’s no crying in woodworking. Swearing, yes… but no crying.
This wouldn’t be an Ashley furniture piece if I didn’t give you documentary-style details. ha
Supplies
- 3/4″ 2×4′ Plywood (2 @ $29.98)
- 1/2″ 2×4′ Plywood (1 @ $29.98)
- 1/8″ 2×4′ Hardboard Panel ($5.59)
- 2×8′ Walnut Wood Veneer 10 mil Paperback ($45.19)
- 3/4″x50′ Walnut Wood Veneer Edge Banding ($15.09)
- (16) #6×1″ Wood Screws ($1.28)
- (6) #8×2″ Bolts, Washers, Nuts
- (8) 1″ Pocket Hole Screws
- (13) 1 1/4″ Pocket Hole Screws
- 1/8″ Bass Wood (scrap for drawer slide shims, if needed)
- 16″ Soft Close Drawer Slides (2 @ $16.68)
- Recessed Power Strip w/ USBs ($20) (I repurposed one)
- Satin Quick-dry Polyurethane
- Mineral Spirits
- Lint-free rags/old t-shirts/sheets
- Buffing Pads 6 Inch Polishing Pads (optional)
- 1″ ID PVC Pipe (small piece for desk hole cover grommet)
- (4) 3/8″ Dowels
Equipment & Tools
- Table Saw
- Miter Saw
- Orbital Sander
- Drill
- Various Size Drill Bits
- Phillips-Head Screwdriver
- 1 1/4″ Hole Saw Bit
- Pocket Hole Jig
- Clamps (90° Pony & 12″ Bars)
- 80, 150, 220 Grit Sandpaper
- Brown Paper Bag
- Wood Glue
- Level
- Tape Measure
- Ruler
- Pencil
- Utility/Exacto Knife
- Painters Tape
- Steam Iron
Total Cost
Thankfully, I wasn’t starting from scratch on supplies and we have a great foundation of essential tools and equipment. We had an unused sheet of 1/2″ plywood, I already had pocket hole screws, sandpaper, and glue (although I ran out of glue halfway through veneering the top and had to go buy more), and I used the concealed outlet from the existing desk. I’d say I spent about $160. Being handmade from scratch and learning = Priceless.
Download the Plans
If you’re interested in downloading the multi-page PDF of plans and specifications, you can do so with a donation in my shop. (Thank you in advance for your support!)
Thoughts & Reflections
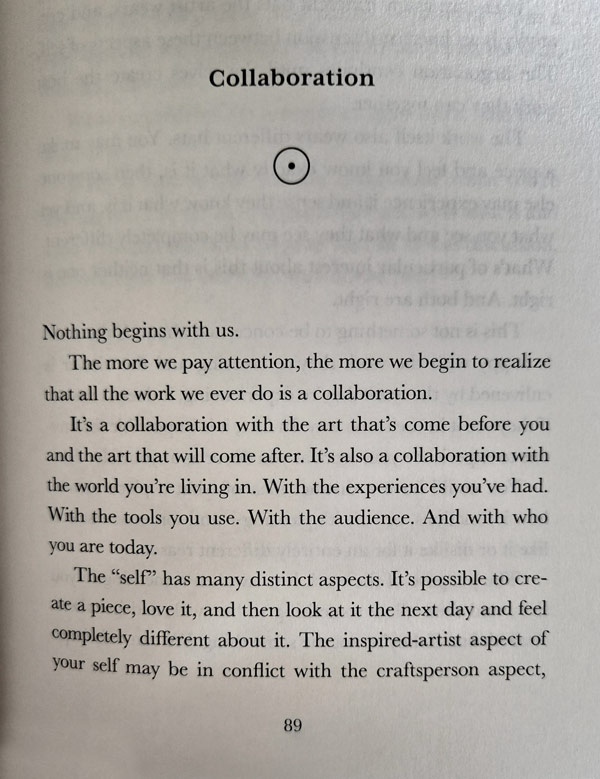
Throughout the building process, I had plenty of time to think, when not laser-focused on measuring 50 million times before cutting; I still cut one of the longest pieces to 42″ that was supposed to be 42.5″ smh, and I had to rebuild the inner drawer boxes and adjust dimensions just slightly to make sure I had room for the drawer slides and middle piece. And lots of time determining the order of attaching pieces. In a book I’m borrowing from Ryan, The Creative Act: A Way of Being by Rick Rubin, he writes about how art is a collaboration. Anything we create is not fully our own. I meditated on that while I was working and thought about both of my grandpas who used to do woodworking, my dad (late father) whose miter saw I use, and rags made from the remainder of one of mom’s old t-shirts.
I thought a lot about how thankful I am for having learned these skills in Tools & Techniques class in college at MWSU and that we own the tools & equipment. My first woodworking project was a cabinet, made from solid walnut that my grandpa gave me, that was supposed to have a drawer, adjustable shelves, and two doors. It ended up being a bookshelf with two shelves, which I still use in my office to this day. It was then I learned that woodworking is very challenging, precise, and takes a lot of planning, time, and effort. I’m disheartened that the fine arts and tools and techniques have been cut from the art program at MWSU and students no longer have the opportunity to learn these invaluable skills.
I asked for and got my first basic toolset from my grandma one Christmas when I was in probably about 5th grade(?) I was pretty excited, even though I had no other materials to work with yet. Most of my woodworking projects have been in the last 5 or so years and are in a gallery on this page. I built shelves in the bathroom of our house, (2) walnut floating nightstands with drawers that we Love, lightboxes, an herb drying rack, a coat rack, a magazine rack, a spice rack, a kitchen countertop shelf rack, a serving tray, plant stands and box, a bench (which did not endure), and hydroponic shelves (another eventual fail). I’m mostly utilitarian and minimal. More woodworking projects to come!
The total weight of the desk is probably sub-40 lbs. Without the front drawer faces it was 37 lbs and I’m not taking it off the wall now to find out. lol
A Note of Thanks
My husband Ryan wanted to make sure you know… I mean… 😉 I want to thank Ryan for putting up with me, helping me mount this thing to the wall (which took hours), and for input on my structural questions. He proudly made the “desk hole cover” (a dust cover piece where the cords go through the desk). Years ago, he also made my bentwood monitor stand and gifted me the leather mouse pad, walnut pencil cup holder, and wrist rest. We love the inspiring products from Grovemade.

