

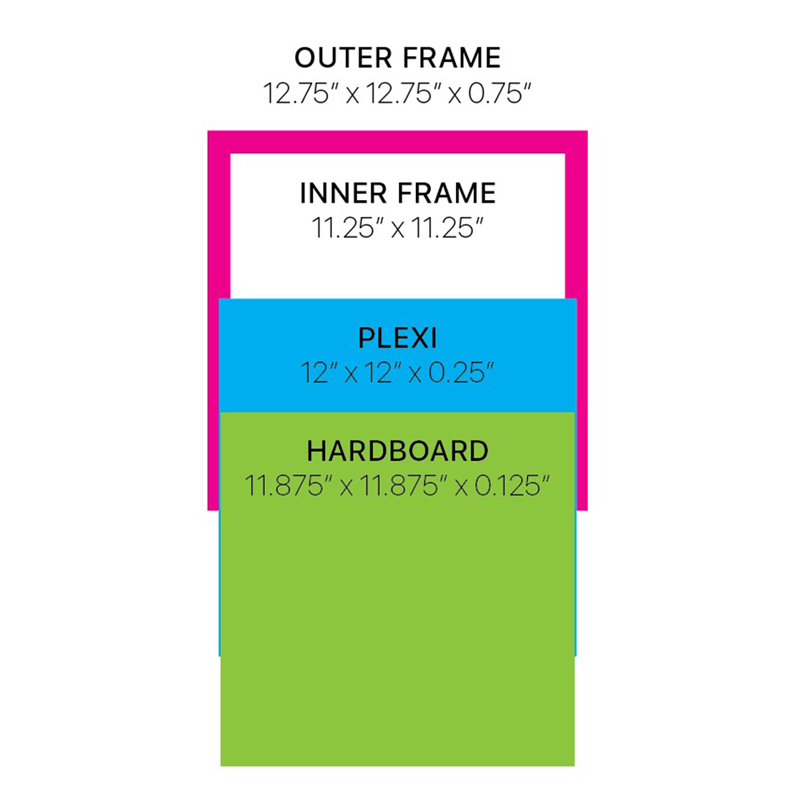
In mid-2015, I built a lightbox for tracing/drawing and documented the process in this article. Today, I’m writing about a slightly different concept with the intent of having a lit frame for artwork to create a glow effect. These two frames are 12×12″. The back is removable, should anything electrical need revisiting.
Supply list
- 1 x 4 x 8′ Select Pine Board (2)
- 1/8 (1/8CAT) x 2’ x 4’ Hardboard Panel
- 5 Meters 5050 Warm White LED Strip Light DC 12V
- LED Strip Connectors with DC Jack (10mm, 2 pin)
- Picture Frame Turn Buttons
- Rust-Oleum® Painter’s Touch® 2X Ultra Cover® Satin White-12 oz
- DC 12 Volt 2 Amp Power Adaptor
- LED Strip Connectors Adapter Connecting Head Switch Clip
- 30 AWG Flexible Silicone Electric Wire
- Sandpaper (220 & 400 grit) and block
- Wood Glue
- 3/4” or 5/8″ 18 Gauge Brad Nails
Tools needed
- Tape Measure
- Table Saw
- Miter/Chop Saw
- Soldering Iron + Wire
- Flux Paste (optional)
- Wire Stripper & Cutter
- Ruler
- Pencil
Safety Accessories
- Safety Goggles
- Ear Protection
- Push stick (for table saw)
- Dust Mask
*Another person (always a good rule of safety to have someone around while you’re cutting in case of an accident or for help holding large pieces of lumber/panel)
Step 1: Planning
The Wood Frame
Sketch/mock up the frame using your dimensions. 
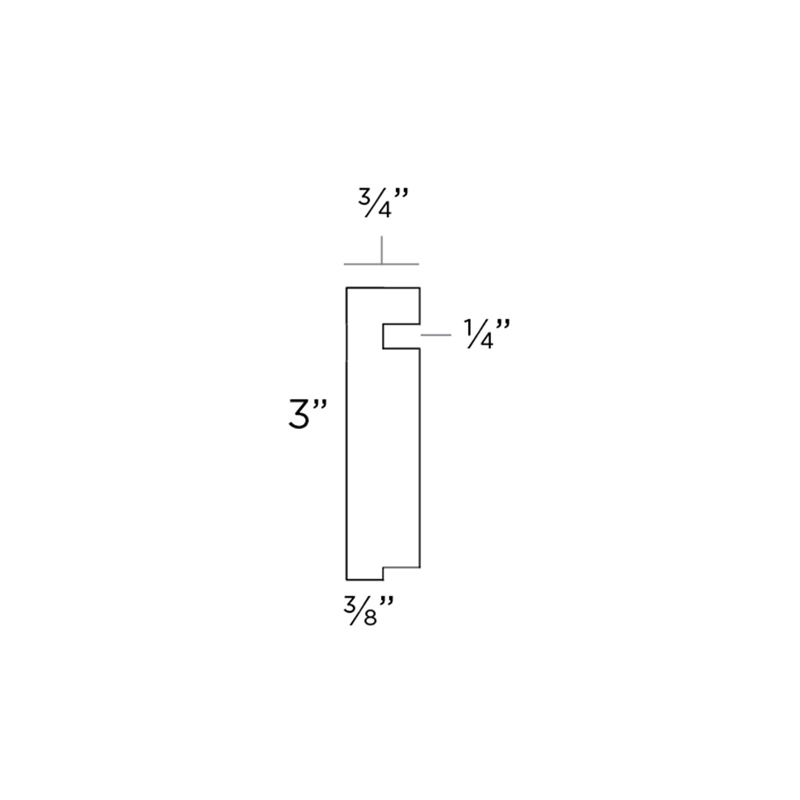
For a frame to fit (2) 1/8″ thick sandwiched pieces of 12×12″ plexiglass, I needed the channel holding the art & plexi to be at least 1/4″ (plus a hair more just in case). I measured 1/4″ from the top to cut the channel. I ended up making my frame (outer width) just slightly larger by 1/16 or less” (12.75″+). The height of the blade for the channel was 3/8″ (1/2 of the board’s depth). The bottom of the frame needed a blade’s width cut to allow the 1/8″ hardboard to be inset on the back and held with turn buttons.
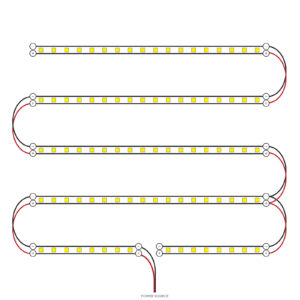
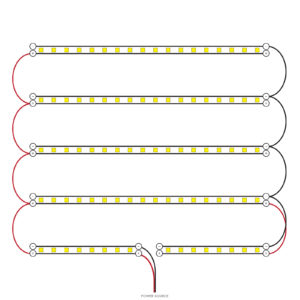
The LED Light Circuit
The hardboard on the back holds the LED light strips. There are so many ways to do this. Here are just a couple of circuit options I considered for the cord to exit center of the frame bottom.
After you’ve thought about this for hours and hours, it’s time to begin measuring (50 million times) and cutting your wood.
Step 2: Cutting Wood
I purchased my (2) 1x4x8′ boards (actual dimensions 3/4″ x 4″ x 8′) at Menards. They were so kind as to cut these at 52″ for me to fit in my car. That way, in a perfect world, I would get 4 sides out of the 52″ board and 3 more out of the remaining 44″. Wherever you’re getting boards, call ahead if you will need them cut. Some stores have policies that won’t allow it, or it depends on who’s working if they’ll do it.
Cut the Depth
With your now manageable length boards, rip the 4″ width boards down to 3 inches (or whatever the depth of your frame) on the table saw.
Cut the 1/4″+ Channel
It’s time to get the table saw blade to 3/8″ and the fence 1/4″ from the blade. Make your first pass on the boards. Move the fence 1/8″ away and make your second pass (perfect world). You can either move the fence just slightly more than 1/8″ or else move the fence after the second pass to get your extra tiny bit of breathing room in the channel. If you want to be safe with making sure your 12×12 plexi fits width- and length-wise, you can raise the blade just a tiny bit above 3/8″.
Cut the 1/8″ Bottom
Keeping the blade height at 3/8″ or just a bit taller, move the fence as close as you can get to the blade and run the bottom edge of the inner part of the frame (side with the channel) face down so the piece looks like this.
Cut 45º Angles
Measure on your board (outer side – not the channel side) to 12.75″ or slightly larger to give yourself a second chance. Stand the board on its smallest edge against the chop saw to cut 45º angles, so the smallest length of the board is with the channel on the inside. Measure and cut each board one at a time (since the blade takes off 1/8″ each time) until you have 4 sides (or however many are needed for your project if making multiple frames).
Cut Hardboard
Cut the hardboard on the table saw to 12×12″.
Step 3: Sanding
Since we’re already using a great quality select pine, we won’t have to do too intense of sanding, but be sure to hit all cut edges lightly with the 220 grit and any larger surfaces with the 400 and sanding block. Wipe away any fine dust particles with a damp paper towel or cloth. Sand all edges of the hardboard as well.
Step 4: Painting
In this case, the client wanted the wood frame painted white. I used a satin white (primer + paint spraypaint), which I thought would look best. I painted the frame before assembling permanently since the artwork was going to be affixed in the frame. Whether you’re painting the frame or not, you will want to paint the inner side of hardboard white to help reflect light. You can also paint the inside of the frame (below the channel), but be sure to tape off the rest of the wood if you plan to stain or use a coat of polyurethane.
Step 5: Soldering the Circuit
The back of LED light strips has an adhesive coating. Measure and mark the spacing of where your strips will go. Cut your strips to size. Then peel the backing off and stick the LED strips to the white side of the hardboard.


